오늘은 redux-saga 를 포스팅 해보도록 하겠다.
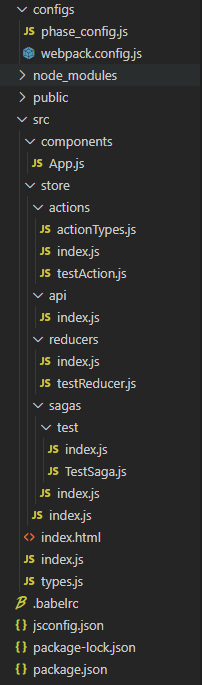
먼저, 폴더 구조, 사용한 dependencies 와 webpack 설정은 아래와 같다.

configs/webpack.config.js
const path = require("path");
const HtmlWebPackPlugin = require("html-webpack-plugin");
const MiniCssExtractPlugin = require("mini-css-extract-plugin");
const webpack = require('webpack');

const PROJECT_ROOT = path.resolve(__dirname, '../');
const APP_ENTRY = path.join(PROJECT_ROOT, 'src');
const PHASE_CONFIG = require('./phase_config');

const NODE_ENV = process.env.NODE_ENV || 'development';
const PHASE = process.env.PHASE || 'local';

console.log('PHASE :: ', PHASE)
const getConfigByAppPhase = () => {
  return Object.keys(PHASE_CONFIG).reduce((result, key) => {
    const value = PHASE_CONFIG[key] && PHASE_CONFIG[key][PHASE] ? PHASE_CONFIG[key][PHASE] : '';
    result[key] = JSON.stringify(value);
    return result;
  }, {});
};

console.log(PHASE)

module.exports = {
  entry: `${APP_ENTRY}/index.js`,
  output: {
    filename: "bundle.js",
    path: path.resolve(__dirname + "../build"),
    publicPath: '/'
  },
  devServer: {
    contentBase: path.resolve("./build"),
    index: "index.html",
    port: 3000
  },
  mode: "development",
  module: {
    rules: [
      {
        test: /\.(js|jsx)$/,
        exclude: "/node_modules",
        use: ['babel-loader'],
      },
      {
        test: /\.html$/,
        use: [
          {
            loader: "html-loader",
            options: { minimize: true }
          }
        ]
      },
      {
        test: /\.css$/,
        use: [MiniCssExtractPlugin.loader, 'css-loader'],
      }
    ]
  },
  plugins: [
    new webpack.DefinePlugin(
      Object.assign(
        {
          'process.env': {
            NODE_ENV: JSON.stringify(NODE_ENV),
            PHASE: JSON.stringify(PHASE)
          },
        },
        getConfigByAppPhase(),
      )
    ),
    new HtmlWebPackPlugin({
      template: `${APP_ENTRY}/index.html`,
      PHASE_CONFIG: getConfigByAppPhase(),
      filename: 'index.html'
    }),
    new MiniCssExtractPlugin({})
  ],
  resolve: {
    extensions: ['.js', '.jsx', '.json', 'css'],
    alias: {
      '@src': path.resolve(PROJECT_ROOT + "/src"),
      '@components': path.resolve(PROJECT_ROOT + "/src/components"),
      '@css': path.resolve(PROJECT_ROOT + "/public/css"),
      '@i18n': path.resolve(PROJECT_ROOT + "/src/i18n"),
      '@store': path.resolve(PROJECT_ROOT + "/src/store"),
      '@sagas': path.resolve(PROJECT_ROOT + "/src/store/sagas")
    }
  }
};
src 디렉토리 아래에 store 디렉토리를 생성하고 actions, api, reducers, sagas 디렉토리를 생성하고 아래와 같이 작성한다.
actions, reducers 부분은 redux 할 때와 동일하게 작성한다.
-
src/store/actions/index.js
import { testLoadRequest, testLoadSuccess, testLoadFail } from './testAction';

const rootAction = { // 모든 action을 관리
    testLoadRequest,
    testLoadSuccess,
    testLoadFail
};

export default rootAction;
-
src/store/actions/actionTypes.js
// action 의 타입을 한번에 관리
export const TEST_LOAD_REQUEST = 'TEST_LOAD_REQUEST'
export const TEST_LOAD_SUCCESS = 'TEST_LOAD_SUCCESS'
export const TEST_LOAD_FAIL = 'TEST_LOAD_FAIL'
-
src/store/actions/testAction.js
import * as TYPES from '@store/actions/actionTypes';

export function testLoadRequest() {
    return{
        type: TYPES.TEST_LOAD_REQUEST,
    };
};

export function testLoadSuccess(payload) {
    return{
        type: TYPES.TEST_LOAD_SUCCESS,
        data: payload
    };
};

export function testLoadFail(error) {
    return{
        type: TYPES.TEST_LOAD_FAIL,
        error
    };
};
-
src/store/api/index.js
import axios from 'axios';

// saga 에서 action type 에 따라 필요한 함수를 호출한다.
function apiTest() {
    console.log('apiTest 입니다.')
    return axios.get(
        'test/apiTest'
    );
};

const api = {
    apiTest
};

export default api;
-
src/store/reducers/index.js
import { combineReducers } from 'redux';

import testReducer from './testReducer';

export default combineReducers({
    test: testReducer,
});
-
src/store/reducers/testReducer.js
import { fromJS } from 'immutable';
import * as TYPES from '@store/actions/actionTypes';

// 초기 store 상태
const INIT_STATE = fromJS({
    data: '',
})

export default function testReducer(state = INIT_STATE, action) {
    switch(action.type){
        case TYPES.TEST_LOAD_REQUEST:
            return state;
        case TYPES.TEST_LOAD_FAIL:
            return [...state, action.error];
        default:
            return state;
    }
};
-
src/store/sagas/index.js
import { all } from 'redux-saga/effects';

import testSaga from '@sagas/test';

export default function* rootSaga() {
    yield all([ // 모든 saga 를 한번에 관리
        ...testSaga,
    ]);
}
-
src/store/sagas/test/index.js
import { takeEvery } from 'redux-saga/effects';

import * as TestSaga from './TestSaga';
import * as TYPES from '@store/actions/actionTypes';

// reducer 처럼 action type 별로 구독하고 있다가
// store 가 변경되면 TestSaga의 getTest 함수를 호출
export default [takeEvery(TYPES.TEST_LOAD_REQUEST, TestSaga.getTest)]
-
src/store/sagas/test/TestSaga.js
import { put, call } from 'redux-saga/effects';

import api from '@store/api';
import rootAction from '@store/actions';

export function* getTest(action) {
    console.log("테스트 성공 :: ", action.type);
    try{
        const { data } = yield call(api.apiTest);
        console.log(data);
        if(!data) data = 'null'
        yield put(rootAction.testLoadSuccess(data));
    } catch (error){
        yield put(rootAction.testLoadFail(error));
    }
}
saga 부분이 생소해서 몇 일 머리를 싸맸었다.
saga 도 redux 에서 state 를 구독하고 있던 것처럼 takeEvery 로 구독하고 있다가 변경 사항이 있으면 해당 action 으로 지정된 함수를 실행하게 된다.
이 함수에서 api 호출이 가능하다.
그럼 이제 작성한 store 를 사용할 수 있도록 src/index.js 파일에 적용 해보자.
src/index.js
import React from "react";
import ReactDOM from "react-dom";
import { Provider } from 'react-redux';

import App from "@components/App";
// store 생성 부분을 따로 빼둠
import configureStore from '@store/index'

// 혹시 모를 error 체크를 위해 try, catch 문 사용
window.onload = async () =>{
    try {
        render()
    } catch(e) {
        console.log('error :: ', e)
    }
}

function render(){
    ReactDOM.render(
    	// redux 의 Provider 로 store 적용
        <Provider store={configureStore()}>
            <App />
        </Provider>
    , document.getElementById("app"));
}
redux 에서는 store 생성하는 부분을 index.js 에 함께 기재 했었으나, 소스 관리를 위해 configureStore 로 빼두었다.
이 부분은 store 디렉토리에 index.js 파일을 생성하여 작성했다.
src/store/index.js
import { createStore, applyMiddleware, compose } from 'redux';
import createSagaMiddleware from 'redux-saga';

import rootReducer from '@store/reducers';
import rootSaga from '@sagas';

// src/index.js 에서 스토어 생성을 위해 뺌
export default function configureStore(initialState) {
	// store 생성
    const sagaMiddleware = createSagaMiddleware()
    const isDevMode = process.env.NODE_ENV === 'development'
    const composeEnhancers = (isDevMode && window.__REDUX_DEVTOOLS_EXTENSION_COMPOSE__) || compose
    // store mount
    const store = createStore(rootReducer, initialState, composeEnhancers(applyMiddleware(sagaMiddleware)))
    // 생성된 store 를 미들웨어에 run
    store.runSaga = sagaMiddleware.run(rootSaga)
    // run 이 정상적으로 완료 되었는 지 확인 console
    console.log('store.runSaga :: ', store.runSaga)
	// 생성된 store return
    return store
}
그리고 컴포넌트에서 store 의 상태를 구독 해보자.
src/components/App.js
import React, { useEffect } from 'react';
import { useDispatch, useSelector } from 'react-redux';

import rootAction from '@store/actions/index'

function App () {
  // store 의 data 받아오기
  const result = useSelector(state => state.data)
  // 함수형 컴포넌트에서 구독을 위해 사용
  const dispatch = useDispatch()

  useEffect(() => {
  	// store 구독
    dispatch(rootAction.testLoadRequest());
  }, []);

  return (
    <div className="App">
      Hello!
    </div>
  )
}

export default App;
위와 같이 많은 코드를 작성 하면 아래와 같은 결과가 나타난다.
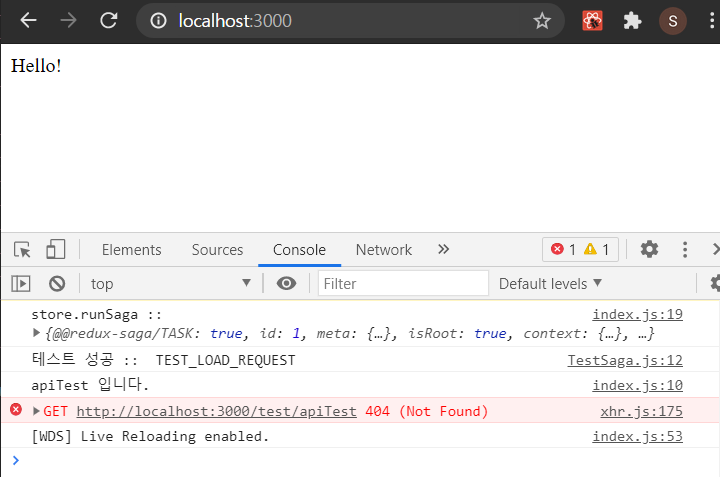
콘솔창의 store.runSaga 는 스토어가 정상적으로 run 되었는 지 확인하기 위해 기재했고, 이상없이 run 된 것을 볼 수 있다.
'테스트 성공' 이라는 문구도 찍힌 것을 보아 하니 saga 도 정상 연결 된 것을 확인했고, saga 에서 호출하는 api 까지 모두 호출 된 것을 볼 수 있다.
아직 api 연결은 하지 않아서, 404 Not Found error 가 발생했다.
이 부분은 다음 포스팅에서 다루도록 해보자.
'React' 카테고리의 다른 글
| [React / typescript] typescript 예제 - 떽떽대는 개발공부 (0) | 2021.03.17 |
|---|---|
| [React] typescript 시작하기 - 떽떽대는 개발공부 (0) | 2021.03.15 |
| [React] cross-env 를 이용하여 환경변수 관리하기(2) - 떽떽대는 개발공부 (0) | 2021.03.11 |
| [React] cross-env 를 이용하여 환경변수 관리하기(1) - 떽떽대는 개발공부 (0) | 2021.03.10 |
| [React] linebreak-style 오류 해결 - 떽떽대는 개발공부 (0) | 2021.03.05 |


댓글