2021.03.04 - [React] - [React] react 에서 다국어 처리 적용하기(3) - 떽떽대는 개발공부
[React] react 에서 다국어 처리 적용하기(3) - 떽떽대는 개발공부
2021/03/02 - [React] - [React] react 에서 다국어 처리 적용하기(2) - 떽떽대는 개발공부 [React] react 에서 다국어 처리 적용하기(2) - 떽떽대는 개발공부 2021/02/19 - [React] - [React] react 에서 다국어..
ddeck.tistory.com
위와 같이 react 에서 다국어 처리 적용하는 법을 포스팅 했었다.
오늘은 typescript 에서 다국어처리를 해보도록 하자. typescript 를 공부하며 많은 부분이 모듈화 되어 폴더 및 디렉토리 생성이 많아졌으므로 개발에 유의한다.
먼저 i18next 를 설치한다.
npm i i18next react-i18next
npm i -D @types/react-i18next
src 디렉토리에 utils 디렉토리를 생성하고 i18nUtils 폴더를 생성한다.
src/utils/i18nUtils.ts
import i18n from 'i18next'
import { initReactI18next } from 'react-i18next'

import { LANGUAGE } from '@/domains/CommonDomain'
import { isDevelopmentMode } from '@/utils/environmentUtils'

async function loadLocaleMessages(currentLanguage: string) {
    let lang = ''
    if (currentLanguage === 'ko') {
        lang = 'ko_KR'
    } else {
        lang = 'en_US'
    }
    // 해당 언어의 message 파일만 import 한다.
    const data = await import(
        /* webpackChunkName: "locale-chunk" */ `../../locales/${lang}.json`
    )
    const locales = data.default
    return { [currentLanguage]: locales }
}

export let $: any = () => {}

export async function init(currentLanguage: string) {
    return i18n
        .use(initReactI18next)
        .init({
            debug: isDevelopmentMode,
            load: 'currentOnly',
            interpolation: {
                escapeValue: true,
                prefix: '{',
                suffix: '}',
            },
            lng: currentLanguage,
            fallbackLng: LANGUAGE.KO,
            resources: await loadLocaleMessages(currentLanguage)
        })
        .then(t => {
            $ = t
        })
}
모듈화 된 LANGUAGE, isDevelopmentMode 파일은 아래와 같다.
src/domains/CommonDomain.ts
export enum LANGUAGE {
    KO = 'ko_KR',
    EN = 'en_US',
}
src/utils/environmentUtils.ts
export const isDevelopmentMode = process.env.NODE_ENV === 'development'
src/hooks/useTrans.ts
import { useTranslation } from 'react-i18next'

export function useTrans() {
    const { t } = useTranslation()

	// 다국어 처리할 메시지, 공통으로 들어갈 메세지
    return function $(key: string, data?: string[]): string {
        return t(key, Object.assign({}, data))
    }
}
사용자의 언어를 받아올 수 있는 모듈을 생성한다.
src/api/BridgeApi.ts
import { INativeInfoResult } from '@/utils/bridgeUtils/features/getNativeInfo'

export const getNativeInfo = (): Promise<INativeInfoResult> => {
    const result: INativeInfoResult = {
        result: {
        	// 사용자의 언어 받아오기
            language: window.navigator.language
        }
    }

    return new Promise((resolve): void => {
        resolve(result)
    })
}
src/utils/bridgeUtils/features/getNativeInfo.ts
export interface INativeInfo {
    language: string
}

export const EmptyNativeInfo: INativeInfo = {
    language: '',
}

export interface INativeInfoResult {
    result: INativeInfo | null
}
이제 index.tsx 파일에서 사용 가능할 수 있도록 init 해준다.
src/index.tsx
import React from 'react'
import reactDOM from 'react-dom'
// npm i ts-optchain
import { oc } from 'ts-optchain'

import { App } from '@/components/App'
import * as Bridge from '@/api/BridgeApi'
import * as i18n from '@/utils/i18nUtils'

window.onload = async () => {
    try{
        const { result } = await Bridge.getNativeInfo()
        console.log('result :: ', result)

		// result 변수 안의 language 에 접근할 수 있다.
        const nativeLang = oc(result).language()
        console.log('nativeLang :: ', nativeLang)

		// i18n init
        await i18n.init(nativeLang as string)

        render()

    } catch (e) {
        console.error(e)
    }
}

function render(){
    reactDOM.render(
        <App />
    ,document.getElementById('app'))
}
실제 변환할 message 를 생성하기 위해 locales 디렉토리를 생성하고 각 언어별 폴더를 작성한다.
locales/ko_KR.json
{
    "translation": {
        "test": "테스트",
        "test2": "{0}번째 테스트"
    }
}
locales/en_US.json
{
    "translation": {
        "test": "this is test",
        "test2": "this is test {0}"
    }
}
실제 변환할 컴포넌트에서 사용할 수 있다.
src/components/App.tsx
import React from 'react'

import { useTrans } from '@/hooks/useTrans'

export const App = () => {
    const $ = useTrans()
    // 모든 문장 다국어 처리
    const text = $('test')
    // 일부 문장 다국어 처리
    const text2 = $('test2', ['2'])

    return (
        <div>
            {text}<br />
            {text2}
        </div>
    )
}
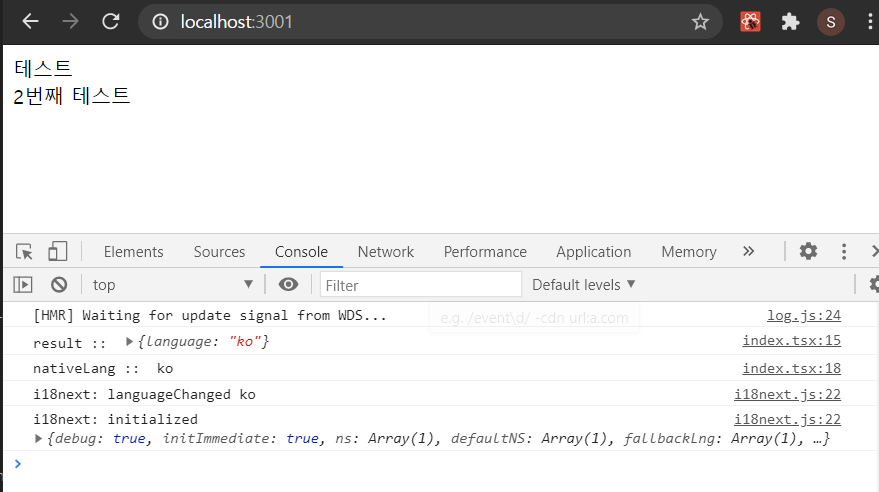
결과는 아래와 같다.


'React' 카테고리의 다른 글
| [React] redux 를 이용하여 popup 창 구현하기 - 떽떽대는 개발공부 (0) | 2021.04.15 |
|---|---|
| [React] react-router-dom, loadable, history 를 이용한 페이지 이동 - 떽떽대는 개발공부 (0) | 2021.04.02 |
| [React] html 파일에서 css 파일 연결하기 - 떽떽대는 개발공부 (0) | 2021.03.24 |
| [React / typescript] typescript 예제 - 떽떽대는 개발공부 (0) | 2021.03.17 |
| [React] typescript 시작하기 - 떽떽대는 개발공부 (0) | 2021.03.15 |


댓글